How to setup Bhim (Bharat Interface for Money)
Happy New Year, everyone! This new year brings with it the "Bhim" app for transferring money directly between bank accounts in India, developed by the National Payment Corporation of India (NPCI). It uses the UPI platform to transfer money online.
You could either send or receive money using the app. I have used the terms "Sender" and "Buyer" synonymously, to mean that a buyer sends money. Similarly, "Receiver" and "Seller" are also used synonymously, to mean that the seller receives money.
Below is a step-by-step manual of how to setup and use the Bhim app (on android phones). The manual is divided into various sections for easy follow through.
Depending on your role, the following sections are relevant:
1. Installation and Setup (mandatory for both sender/receiver)
2. Generating QR Code (one-time step for receiver to identify his/her account to the sender)
3. UPI Pin Management (required by sender to authenticate transactions)
4. Send Money (initiated by sender to send money)
5. Request Money (transaction model - seller requests and buyer pays)


2.2. Enter any amount and click the Generate button.

2.3. The QR code is generated and displayed. You could share (standard sharing options like whatsapp) or download it. Once this is done, the receiver need not be connected to the internet to receive money. You could print and exhibit this in your shop, or show the downloaded image to the buyer (who needs to send you the money) for live scan using his/her Bhim app.


4.1.2. Both options above would navigate to the details page where you could verify the receiver's name, enter the required amount and click "Pay". You could also save the address for future use.

4.1.3. Enter the UPI Pin (generated in section 3 above) for security verification. The payment gets processed immediately, the receiver's account is credited and confirmation shown. The receiver gets a notification too, that the money has been credited to his/her account.


You could either send or receive money using the app. I have used the terms "Sender" and "Buyer" synonymously, to mean that a buyer sends money. Similarly, "Receiver" and "Seller" are also used synonymously, to mean that the seller receives money.
Below is a step-by-step manual of how to setup and use the Bhim app (on android phones). The manual is divided into various sections for easy follow through.
Depending on your role, the following sections are relevant:
1. Installation and Setup (mandatory for both sender/receiver)
2. Generating QR Code (one-time step for receiver to identify his/her account to the sender)
3. UPI Pin Management (required by sender to authenticate transactions)
4. Send Money (initiated by sender to send money)
5. Request Money (transaction model - seller requests and buyer pays)
1. Installation and Setup (sender/receiver)
1.1. Download and Install the Bhim App
Search for "Bhim" in the Google Play Store, and click on the new Bhim app (icon with orange and green overlapped triangles). Click Install. As of 3rd January, it already has "1 Million" downloads. Open the app after it downloads and installs.
Search for "Bhim" in the Google Play Store, and click on the new Bhim app (icon with orange and green overlapped triangles). Click Install. As of 3rd January, it already has "1 Million" downloads. Open the app after it downloads and installs.
 |
1.2. Choose Language
There is support for English and Hindi currently.
Scope for improvement: Hopefully, all other official languages would be added in the near future.

1.3. Skip through the information screens

1.4. Allow access via SMS (incurs cost)
Allow a SMS to be sent from your mobile to the server, to detect your mobile number.
Scope for improvement: This deducts the normal SMS charge from your account. Hopefully, they devise a mechanism to detect the mobile number automatically without the user having to incur this cost.


1.5. Register Passcode
Once the mobile number is verified, you need to enter a passcode for the app. Make sure you type a 4-digit number you would easily remember, but one that others would not know and is difficult (ideally impossible) to guess.
Note: This is the password to enter into the app (required every time you open the app), and NOT the UPI Pin used in each transaction.

1.6. Select the primary bank account
Once the passcode is saved, the list of all supported banks is shown. Select a bank to fetch your account that is already linked with this mobile number.
Note:
a. If you have multiple accounts in a bank or in different banks, you could choose any one as the primary account for transactions. This could be changed at any point using the app itself.
b. Make sure the mobile number is already linked to the desired bank account. The procedure for this varies across banks, and should be a simple one.


1.7. Voila, Basics are all set!
That is it! You have now setup your bank account with the Bhim App. You could view the subsequent options in your home screen below.

2. Generating QR Code (one-time optional step for receiver)
A QR code is a two-dimensional matrix bar code that contains embedded information and could be scanned by code readers (in-built in the app). You could generate a QR code to identify yourself as the receiver.
2.1. From the top right options, select "Generate QR Code".

2.2. Enter any amount and click the Generate button.
Note: I am not aware if the amount in this page has any significance. A sender could send a different amount of money after scanning this QR code, irrespective of the amount entered while it was generated.
2.3. The QR code is generated and displayed. You could share (standard sharing options like whatsapp) or download it. Once this is done, the receiver need not be connected to the internet to receive money. You could print and exhibit this in your shop, or show the downloaded image to the buyer (who needs to send you the money) for live scan using his/her Bhim app.

3. UPI Pin Management (sender)
You need a UPI Pin to pay money to another account. This pin (4-digit number) will be inquired by the app for every transaction initiated in the app. You need to set the UPI Pin first to start sending money. You could subsequently change it at any point later using the app itself.
3.1. Set UPI Pin
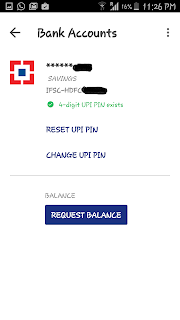
3.1.1. To set the UPI Pin, click on "Bank Accounts" in your home page. This shows the primary account set in the app, along with other options.

3.1.2. Click on "Reset UPI Pin". The app launches the "Set UPI Pin" flow, asking to enter the last 6 digits of your debit card along with the expiry date.
Scope for improvement: At this point, it seems to be mandatory for one to have a debit card for the account to be used with the app. Hopefully, there are plans to enforce this security check in other ways to accommodate those that do not have a debit card.

3.1.3 Once the debit card details are entered correctly, there is an OTP sent to your mobile. This gets auto-detected and the app moves to the next pages, where you can enter and confirm the UPI Pin.
Note: For optimum security, set a UPI Pin different from the passcode used to launch the app. I personally would also suggest to use a number different from the ATM Pin of your debit card for added security. Just make sure you are able to remember all these numbers without noting them down anywhere.
3.2. Change UPI Pin (not part of the basic mandatory setup)
3.2.1. You could change the UPI Pin in the future using the app itself. Select "Change UPI Pin" after navigating to the "Bank Accounts" page from your home page. Enter your current UPI Pin, the new pin and confirm it again in subsequent pages to effect the change.
Scope for improvement: I currently do not know if there is a time limit after which the app expires the pin, thus forcing one to change it periodically. This would be a good security feature to add (if it does not exist yet).
4. Send Money
Once a transaction is finalized (say, you have obtained the required groceries and need to pay the seller), you could send the bill amount to the seller's account directly.
4.1. Identify the sender
4.1.1. If the receiver has the QR code displayed/shared, you could select the "Scan & Pay" option in your home page (which will use the mobile camera) and scan the QR code to identify the receiver address. Alternatively, you could select the "Send Money" option in your home page and manually enter/verify the mobile number or UPI address of the receiver as below.


5. Request Money (transaction model)
5.1. Receiver (Seller)
A receiver could also initiate a transaction by requesting for money. Once a transaction is finalized (say, you have supplied the required groceries and need to request for bill payment), you could send a request for the relevant amount to the buyer, who could then respond/fulfill it from his app directly.
5.1.1. Select "Request" option from the home page. It would ask for the mobile number or payment address of the buyer. Enter the details, verify the name and proceed to the "Request Money" page. Enter the required amount, validity date and click "Request".

5.2. Sender (Buyer)
The buyer gets a notification in the app that there is a request placed for payment of money. You could choose to decline/pay the amount directly from the notification.
5.2.1. Once the notification is received, select "Pay". Check the details in the page and click "Pay" again to complete the transaction.

Labels: Bhim, Demonetization, Direct Money Transfer Between Accounts, How to setup Bhim, National Payment Corporation of India, NPCI, Use Bhim
posted by sravan at
1:31 PM
![]()


0 Comments:
Post a Comment
Subscribe to Post Comments [Atom]
<< Home